Tuesday, February 14, 2017

How To Add A Class Link

Class links are links to outside resources related to a class such as the class website, syllabus, assignments, etc. Anything that has a URL address (www.example.com) can be added as a class link.

Only class creators and admins can add class links.

To add a class link, go to the page of the class you want to add to and follow these steps:
(See screenshots below for a visual representation of these steps)
  1. Click the "Links" tab
  2. Click "Add a Link"
  3. Enter the "Text to display"
  4. Enter the "URL"
  5. Click "Save"

Screenshot 1


Screenshot 2


That's all it takes to create a class link. To remove a class link simply click the corresponding "X".


Class Admins: What They Are And How To Add One (Or More) To Your Class

If you don't know what Easy Notecards Classes are check out Introduction to Classes.

Class Admin Privileges

Here's what class admins can do that regular class members cannot:
  • Add and remove sets*
  • Add and remove class links
  • Invite members*
  • Remove members who are not admins
  • Accept and deny requests to join the class
*By default, regular class members can add sets and invite members; however, the class creator can turn these options off.

How to Grant Admin Privileges

To grant or revoke admin privileges you must be the class creator. A class can have multiple admins.

On the page of the class you want to add an admin to follow these steps:
(See screenshot below for a visual representation of these steps)
  1. Click the "Members" tab
  2. Click the down arrow for the member you want to grant admin privileges to
  3. Click the "Grant admin privileges" option


You will then be presented with a dialog to confirm your action.

That's it. You can easily remove admin privileges for a member by following the same steps.

Try it out now by creating your first class!

Good Luck this semester!

http://www.easynotecards.com

Tuesday, October 4, 2016

Introducing Classes

We're excited to introduce you to Easy Notecards Classes. With classes, you can manage card sets, links and members (classmates or students) for specific classes.

Here are a few class features:
  • Create/Join an unlimited number of classes.
  • Each class can have an unlimited number of card sets, links and members.
  • Class links can be used to link to outside resources such as a class website, syllabus, assignment, etc.
  • Control who can view your class. By default, the class is only viewable by class members.
  • Allow others to join your class by providing them with the class code or the auto join link.
  • Promote other class members to class admins. Class admins have additional privileges that regular class members don't.
  • Turn on the option "Require full name to join" to easily manage class members.
  • Instructor and school can be entered for easier searching. (Class search coming soon)
  • Add private and protected sets to a class. These sets will be viewable by all class members without the need of a password.

Below you'll learn how to create, join and invite members to a class. But first, let's take a look at the Class page.

Class Page

Once you are a member of a class the Class page will look something like this: (Red numbers have been added for identification)


  1. Class Details tab - Displays info such as creator, instructor, school and description.
  2. Invite tab - Displays class link, auto join link and class code. Class creator controls if all class members can access this tab.
  3. Class Options - Provides options to edit (creator only), delete (creator only), leave or report a class.
  4. Class Sets tab - Shows all class sets. By default, all class members can add sets. Click Add a Set to add 1 or more sets from your created or favorite sets. Class creator and admins can remove any set. Other members can remove sets they added. 
  5. Class Links tab - Shows all class links. Only the class creator and admins can add and remove class links.
  6. Class Members tab - Shows all class members. Class creator can grant/revoke admin privileges and remove members. Class admins can remove members except for the class creator and other class admins.
  7. Class Activity - Displays certain activity such as when a class member adds a set/link or joins/leaves the class.


How to Create a Class

To create a class click Create Class on the My Classes page. Here's what the create Class Page looks like:


Class name is the only required field but it is highly recommended you include instructor and school.
  • Class name - The name of the class.
  • Description - A description of the class.
  • Instructor - The class instructor(s). You also have the option to select I'm the instructor which will make it clear to anyone who views the class that it was created by the instructor.
  • School - The school the class takes place at. Schools for other classes you belong to will be available for easy selection.
  • Who can view class data - By default, only class members can view class data (sets, links, members and activity), however, you can choose to allow everyone to be able to view this data.
  • Require full name to join - When this option is selected, a first and last name is required to join the class. Please note, once there is more than 1 class member this option cannot be turned on.
  • Who can add sets - By default, all class members can add sets, however, you can choose to allow only the class creator and admins to be able to add sets.
  • Who can invite others - By default, all class members will be able to see the Invite tab. The Invite tab displays info on how to invite other members. You can change this so only the class creator and admins can see this info.


How to Join a Class

If you have the class code, go to the My Classes page, click Enter Class Code.. and enter the class code. You can also enter the class code on the Class page.

If you are provided with a class link, chances are it is an auto join link. An auto join link allows you to join a class automatically without having to enter the class code. If it's not an auto join link you will either have to enter the class code or request to join the class.

You can also be invited within Easy Notecards to join a class. When invited, you will receive a notification on your Notifications page that has a link to the class. When you go to the class page you will be able to join the class without having to enter the class code.

If you don't have the class code or an auto join link and have not been invited to join a class you can still request to join a class. To do this go to the Class page and click the Request to join this class link. The class creator (and admins) will have the option to either accept or deny your request.

How to Invite Others to Your Class

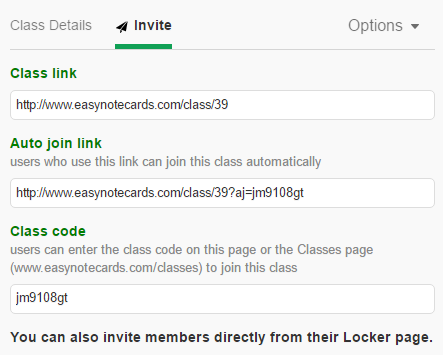
By default, all class members can view the Invite tab. The Invite tab (shown below) shows the multiple ways you can invite others to your class.


  • Class link - Basic link to the class. Users will still need the class code to join or they can request to join the class.
  • Auto join link - Users who use this link can join the class automatically. 
  • Class code - Users who have the class code can join the class either on the My Classes page or the Class page.
You can also invite members from their Locker page. To do this, go to the Locker of the member you want to invite, click Invite to Class (top right corner), select the class(es) and click Invite. The member will receive an invite notification that will allow him/her to join the class automatically.

More To Come...

Two class features that will be added in the near future are Class Search and Class Discussion. We also plan on adding a Teacher Mode, which will allow teachers to track their students' activity. This feature is a little further down the road.

Classes are a great way to share and organize your course material. Try them out today: Easy Notecards Classes

Good Luck this semester!

http://www.easynotecards.com

Monday, February 2, 2015

Run Easy Notecards as a Web App

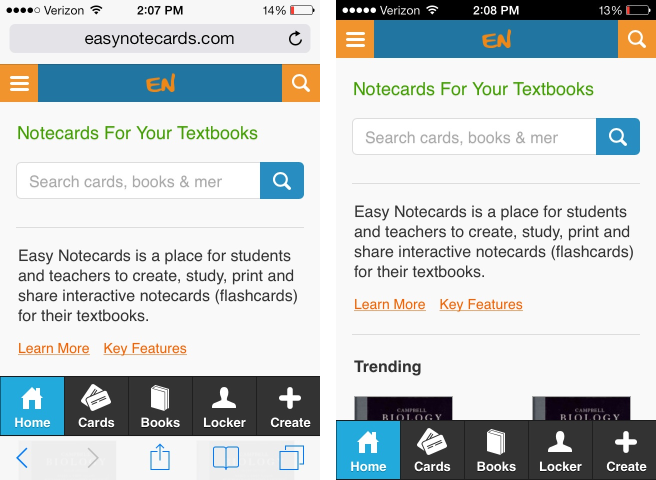
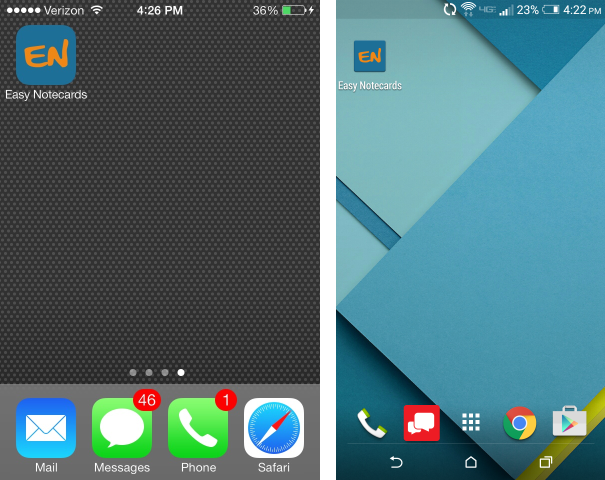
We're excited to announce that you can now run Easy Notecards as a web app on both iOS and Android devices. To do this simply add Easy Notecards to your home screen from your browser.

Here are the benefits of running Easy Notecards as a web app:
  • Launch Easy Notecards with an icon on your homescreen. No need to open your browser.
  • None of the browser's UI (address bar, back button, etc.) will be visible.
  • Easy Notecards will be its own entity in Recent Apps.
  • Unlike traditional apps you will ALWAYS be using the latest version of Easy Notecards. No need to update ever.


Website vs Web App

How to Add Easy Notecards to Your Home Screen

Follow theses simple steps to add Easy Notecards to your home screen. Your screen may differ slightly based on the device and OS version you are using.

iOS (iPhones and iPads) 

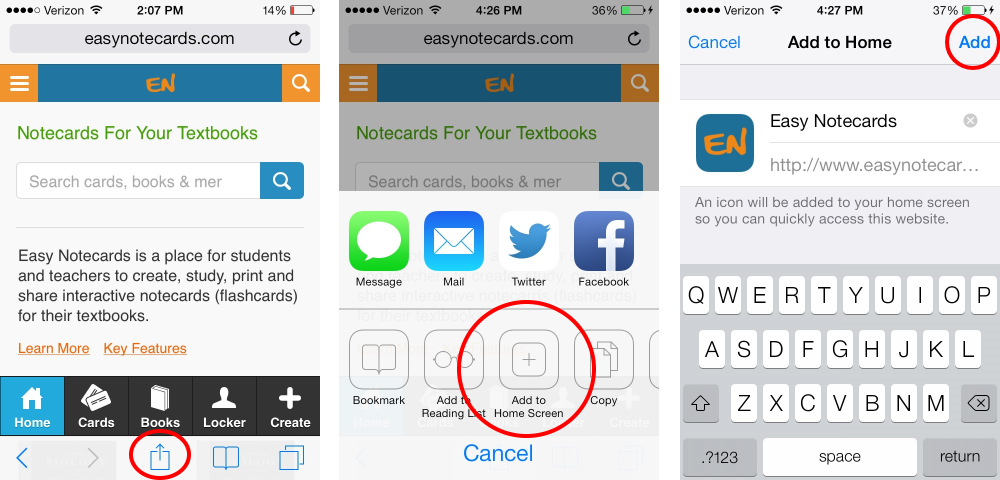
Step 1: Open Safari and navigate to EasyNotecards.com
Step 2: Tap the Share Button
Step 3: Tap Add to Home Screen
Step 4: Tap Add


Steps to add to iOS Home Screen

Note: On iOS, whatever page you are on when you add Easy Notecards to your home screen will be the first page shown every time you launch Easy Notecards.

Android (phones and tablets)

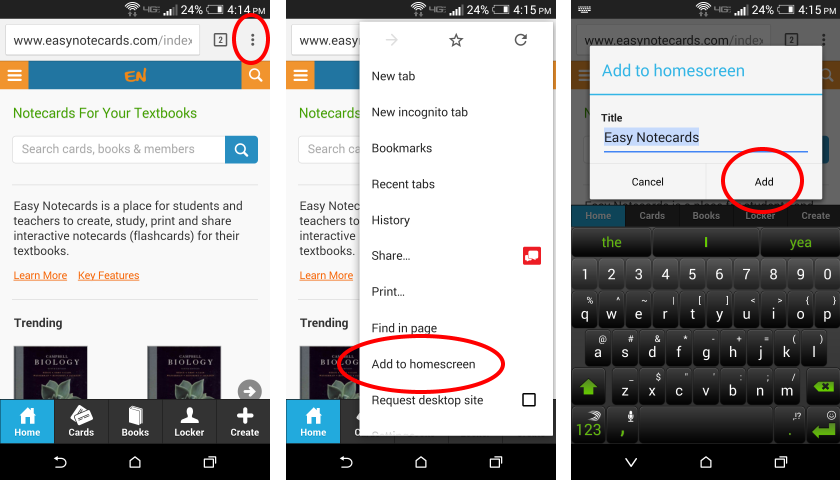
Step 1: Open Chrome and navigate to EasyNotecards.com
Step 2: Tap the Menu Button
Step 3: Tap Add to homescreen
Step 4: Tap Add


Steps to add to Android Home Screen

That's it! Now you can launch Easy Notecards directly from your home screen.


Easy Notecards on Home Screen for iOS and Android 

Navigating Back a Page

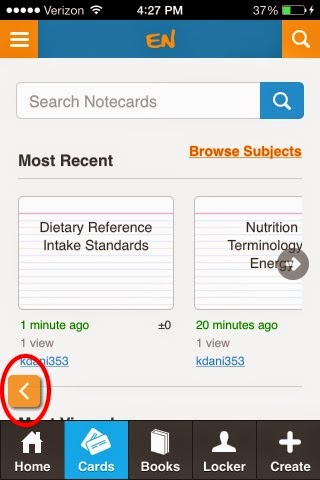
Android users can simply use the dedicated back button to go back a page within Easy Notecards. For iOS users there is no dedicated back button so we added a back button within the web app. Look at the image below to see the location of the back button.


Back Button on iOS 

Note: While taking a quiz or playing a matching game the back button is temporarily removed so that it doesn't interfere with the activity.


If you use Easy Notecards on your mobile device you should definitely run it as a web app. It's super easy to do and makes the experience that much better.

Good Luck this semester!

http://www.easynotecards.com

Saturday, January 10, 2015

Our Quizzes Just Got A Whole Lot Smarter

A dynamically created quiz can be taken for any notecard set that has at least 2 full cards. Since the quiz is created on the fly it will be different every time you take it.

The Old, Not So Smart Quizzes

The main problem with the old quizzes was that the wrong answers for each question were chosen at random. This often resulted in quiz answers that were very different from each other making it easier to select the correct answer.

For example, let's say you created a card set that contained both multiple choice and true false questions. You go to take the quiz and the first question is a true/false question. You look at the possible answers and this is what you see: True, B, A, C. The only possible answer to the question is True since False is nowhere to be found.

In addition, there were times when a quiz question would contain duplicate answers. Not only did this reduce the number of possible answers by 1, an observant user would soon learn that a duplicate answer was never the correct answer.

All of this has been eliminated with our new, smarter quizzes.

The New, Smarter Quizzes

First, answers are never duplicated.

Second, the wrong answers are no longer randomly selected. They are selected based on how similar they are to the correct answer.  If the correct answer to a quiz question has an image with no text then the wrong answers will have an image with no text (if they exist within the card set).

Similarity between the correct answer and wrong answers is based on:
  • total number of words
  • total number of characters
  • contains a list
    • if a list exists then list type is considered
  • has an image

Lastly, True/False and Yes/No are special cases that are handled differently. Only 2 answers are presented to the user for these type of questions.

We hope you enjoy the improvements to our quizzes. Try it out on your own sets or try one of these:


Wednesday, December 10, 2014

Edit Single Card

You can now edit a single card without having to edit the whole set. This can be done in both list and card view.

To edit a card in list view click the card #. On touch enabled devices you can also swipe left or right on the card to start the edit process.


To edit a card in card view click the edit card icon.


When editing a single card you have the same options as you do when creating or editing a set.


When done editing click Save to save changes or cancel to discard them.


That's it. Now you don't have to edit a whole notecard set just to edit one or two cards.

Good Luck!


Sunday, November 30, 2014

Create Set Page Updated with New Formatting Options

The Create Set page has been updated to match the new responsive design of Easy Notecards. This new responsive design looks and works great on all your devices.

The biggest feature offered by the new Create Set page is the ability to format notecards. With a few simple tools you can now add emphasis and style to your cards.

Formatting Toolbar


The camera icon is used to upload or link to an image.

Formatting Toolbar Buttons (left to right):
  • Undo
  • Redo
  • Bold
  • Italic
  • Underline
  • Superscript
  • Subscript
  • Background color - Click down arrow to choose from 5 colors:
    • yellow
    • lime
    • aqua
    • pink
    • orange
  • Bullet list - Click down arrow to choose from 4 types:
    • Default 
    • Circle
    • Disk
    • Square
  • Numbered list - Click down arrow to choose from 6 types:
    • Default - 1, 2, 3, etc
    • Lower Alpha - a, b, c, etc
    • Lower Greek - Î±, Î², Î³, etc
    • Lower Roman - i, ii, iii, etc
    • Upper Alpha - A, B, C, etc
    • Upper Roman - I, II, III, etc
  • Decrease indent - Can be used for lists and paragraphs
  • Increase indent - Can be used for lists and paragraphs

We may add additional formatting options in the future based on user request.

Formatting Tips
  • Toolbar keyboard shortcuts:
    • ctrl+z Undo
    • ctrl+y Redo
    • ctrl+b Bold
    • ctrl+i Italic
    • ctrl+u Underline
  • To increase/decrease indent for a list or paragraph you must use the toolbar buttons since pressing TAB takes you to the next card
  • Formatting is kept when pasting from another source. This doesn't always work well. Use ctrl+shift+v to paste as plain text. (In chrome you can also right click and select Paste as plain text)
  • To single space use shift+enter

Quick Note. The ability to edit a card from list and card view will be added back sometime this week. Import cards will be added back within the next 2 weeks.

As the semester winds down we here at Easy Notecards have a message for you all:

"Good Luck and FINISH STRONG!"


Monday, August 25, 2014

New Responsive Website Design

We've spent the last few months redesigning Easy Notecards so it looks great on all of your devices. After many long hours and energy drinks we are now ready to release it to the public. Check out What's New below then try it out yourself.

What's New:
  • Responsive Design: Works and looks great on phones, tablets, laptops, desktops, TVs and more.
  • New Look: Simple yet powerful interface. 
  • Feels Like an App: Thanks to some new technologies, Easy Notecards feels less like a website and more like an app.
  • Touch Friendly: Use your touchscreen to interact with Easy Notecards. Swipe to cycle through cards and quiz questions. Drag and drop cards in the matching game.
  • Site Wide Search: Search from any page. Search results for Notecards, Books and Members are now combined into one page. 
  • Group By Book, Chapter or None: When viewing your locker you can now group notecard sets by book, chapter or none. In the past they were always grouped by chapter. You also have the option to remove grouping when viewing a book.
  • Card Display Remembered: Easy Notecards now remembers if you like to have the front or back of the card displayed first or both sides at once.
  • Go to a Specific Card: When viewing notecards click the progress counter (e.g. "1/33") to enter the card number to go to.

Two quick notes:
  • You can continue to use the old design by clicking the "Switch to the classic version" link located at the bottom of the home page.
  • Most, but not all pages have been converted yet. We are working hard to get all pages converted ASAP. Thanks for your patience.

We hope you enjoy using the new Easy Notecards! Please use our contact form for any questions or comments.

Good Luck This Semester!
http://www.easynotecards.com

Wednesday, November 14, 2012

New Feature: Private Messaging

We've added a simple messaging system that allows you to send private messages to any Easy Notecards member. Private messages will be displayed on your notifications page. To prevent abuse, you can turn off private messaging completely or block certain members.

Keep reading for more details about the new private messaging system.

How To Send A Private Message
There are 2 ways to send a private message:

Way 1: While viewing the locker of the member you want to send a message to, click the "Send Private Message" link.


Way 2: When viewing a private message another member sent you, click the "Reply" link.

A box will pop up to compose and send your message.


How To Read A Private Message
Private messages are really just notifications. To view notifications click the "Notifications" button on the top right of each page. There will be a red number within the button if you have any new notifications.


How To Block A Member
To block a member, simply click the "Block member name" under the message he sent you. Keep in mind that when you block a member he will no longer be able to send you private messages and all messages he sent you will be deleted. This action cannot be undone.

How To Turn Off Private Messaging
Private messaging is turned on by default but can easily be turned off. To turn off private messaging go to "Settings", deselect "I receive a private message" under Notifications and click Save. You can change this setting anytime.


That's pretty much all there is to the private messaging system. It's super easy to use. We get a lot of questions about how to get the password for certain password-protected notecard sets. With the messaging system you can now simply message the creator of the set and ask him/her if you can have the password.

Good Luck With Your Studies!
http://www.easynotecards.com

Tuesday, September 18, 2012

New Feature: Subjects

Subjects help categorize notecard sets and books making it much easier to find material to study. They are available for both notecard sets and books. Examples of subjects are math, a&p, us history etc.

To view Notecard Subjects click the Notecards tab and then click the Browse Notecard Subjects link located to the right of the search box.

Similarly, to view Book Subjects click the Books tab and then click the Browse Book Subjects link located to the right of the search box.

When viewing subjects you may of noticed the number to the right of each subject. This represents the number of items that belong to that particular subject. The more items that belong to a subject the more popular it is considered. Subjects can be sorted by Popularity or Name. The default is Popularity.

Subjects can also be filtered by letter or searched. When searching subjects the results will automatically update as you type. Below is a screenshot of a notecard subject search:


Viewing Items that Belong to a Subject

Click a subject to view all items that belong to it. The result will be displayed on the search results page. This allows you to search within a particular subject or subjects. This example searches the history subject for notecards that contain the phrase "civil war".

You can also look in more than 1 subject at a time. This example displays all books that belong to biology OR anatomy & physiology. When there is more than 1 subject they are connected with the keyword OR. This means if you have the subjects math and science results will include items that belong to either math or science or both.

To add a subject when already viewing results simple enter a subject in the "add subject filter" input box and hit ENTER. As you type suggestions will be provided. Below is a screenshot of adding an additional subject:


Adding Your Own Notecard Subjects

Notecard subjects have been around for a while but they were originally called tags. We felt that subjects was a more descriptive word so we have converted all tags to subjects.

When creating or editing a notecard set you can add as many subjects as you'd like as long as the length of all subjects is 256 characters or less. As you type in the input box suggestions will be provided. Although subjects are optional we recommend you add at least 1 subject to help categorize your notecard set.

When you link your notecards to a book it will automatically be added to all of the book's subjects. For example, if link your notecards to a book that has the subject science your notecards will be added to the science subject even if you did not enter any subjects.

Creative Subject Usage

Feel free to use subjects in any way that makes your notecards easier to find. Here are a couple scenarios.

Scenario #1.
You and your classmates want to create and share notecards for a particular class. To make it easy to find these notecards have everyone add their notecards to the same unique subject such as "mrs. robinson's class" or "trinity hs science 2012".

Scenario #2
You want to share a few of your many notecard sets with Tommy Harris. Simple add a unique subject such as "for tommy_h" to the ones you want to share with him so he can easily find them.

I'm sure you can think of other scenarios where subjects can be used in a creative and effective way.

Good Luck With Your Studies!
http://www.easynotecards.com

Thursday, July 12, 2012

Single Player BINGO Is Now Available

In addition to Multiplayer BINGO, Single Player BINGO is now available!

For those of you not familiar with the new BINGO game, BINGO cards are created using one side of the notecards and BINGO calls are created using the other. It's a great way to learn new material while having fun.

Single Player BINGO puts you up against 4 computer opponents with different skill levels. Below is an In-Game screenshot. Notice the Players List directly below your BINGO card.


To play Single Player BINGO

Step 1: While viewing a notecard set, click the blue "BINGO" button

Step 2: Click the " Play against computer opponents " link under Single Player

Step 3: Select the number of cards, the card data and click "Start Game"

Here are some examples of Single Player BINGO Games:

Don't forget about the Multiplayer BINGO Rooms! Join an existing room or create your own.

We hope you are enjoying your Summer!


Thursday, July 5, 2012

BINGO Update: Multiplayer and Single Player

You may of noticed that you can create a Multiplayer BINGO Room for any notecard set on Easy Notecards that has at least 10 full (front and back) notecards.

To create a Multiplayer BINGO Room

Step 1: While viewing a notecard set, click the blue "BINGO" button

Step 2: Click the "Create a new Game Room" link under Multiplayer

Step 3: Enter the "Room Name", select options and click the green "Create Room" button

Multiplayer BINGO Rooms can hold up to 25 players and must have at least 2 players for the game to begin. An account is not required to play.


Single Player Mode is in the works and will be available sometime in mid July. In Single Player Mode you play against computer opponents.

Hope you are having a great Summer!

http://www.easynotecards.com

Monday, June 25, 2012

New Multiplayer Bingo Game Ready For Final Testing!

We're very excited to announce that our 1st multiplayer game, Bingo, is ready for final testing.

WHEN: Tuesday, June 26th from Noon EST to 11:59PM EST.
WHERE: http://www.easynotecards.com/bingo_rooms

There will be many Bingo Rooms open for testing. Use our Contact Form (subject "Bingo") to provide feedback (suggestions, comments or problems) about the game. You can also provide feedback by posting a comment to this blog post.

More About the Game
Once Bingo is officially released in a week or so users will be able to create a Bingo Room for any notecard set available on Easy Notecards! Also, we are working on a Single Player Mode that will be available sometime in July.

There are 2 Game Types:
  • Cover All - A valid BINGO is when all items are selected. Uses a 3 x 3 card for notecard sets with less than 30 notecards.
  • 5 In A Row - A valid BINGO is when 5 items in a row are correctly selected to form a horizontal, vertical or diaganol line. Uses a 5 x 5 card for notecard sets with 30 or more notecards.
Features:
  • Chat - Talk with other players in the room. You can send a private message to a player by using the @ sign. For example: "@player_name Good Luck!" will only be seen by player_name.
  • Multiple Cards - Play up to 3 cards at once.
  • Select Bingo Card Data to Use - When creating a Bingo Room you can select to use either the front or back of notecards to be used for the Bingo Card Data.
  • Password Protect - You can enter a password to restrict access to the Bingo Room you create.
  • Player Stats - When the game is over view selections you got correct, incorrect and missed.
  • Speed Up Intermission - By default there is a 1 minute intermission between games. If more than half of the room is ready the intermission will be set to 5 seconds.
  • Cumulative Bingo Points - Your overall Bingo Points will be tracked and displayed in Your Locker.
We hope you enjoy the new game that is both educational and fun!


Wednesday, February 15, 2012

Linking Notecards to a Specific Book

Easy Notecards is the only website of its kind that lets you link your notecards/flashcards to a specific book. We take this one step further by allowing you to also enter the chapters of the book the notecards are for. Since notecards are organized by chapters within a book everything remains well organized and easy to find.

How to link to a book and chapters
When creating or editing notecards you'll notice the Book section. This is where you can link your notecards to a book. The 2 fields are ISBN and Chapter(s). If you don't have access to your book's ISBN simply click the "Find my book" link to search for your book by title, author, subject, etc. For Chapter(s) enter 1 or more chapters the notecards pertain to. If the notecards are not for a specific chapter, you can leave Chapter(s) blank. This will result in your notecards being listed under "No Chapter".


Searching for books
Easy Notecards lets you search for books by ISBN, title, author, subject , publisher and more. It's important to know that when you search for a book only books that have at least 1 notecard set are searched, which at the time of this post is around 150. You can, however, create notecards for any of the more than 15 million books on Google Books. So, if you can't find your book it usually means that no one has created notecards for it yet. You can be the first!


Viewing all notecard sets for a book
Here's where the power of book linking shines through. Check out the Medical Terminology in a Flash! book (image below). Notice how the notecard sets are organized by the chapters of the book. Notecard sets are sorted within chapters by Helpfulness. You have the option to change the sort order to Views or Newest.


Viewing the book a notecard set is linked to
When viewing a notecard set take a look to the right to see the book and chapters the notecard set is for. If the notecard set is not linked to a book then there will be no data for book. The image below shows that the notecard set The Hematologic System is for Chapter 4 of the Practice Questions for NCLEX-PN book.


Locker organization
Your locker organizes Created Sets, Marked Sets and Fav Sets by books. If a notecard set is not linked to a book it will be listed under "No Book". Here's an example of a member's Favorite Notecard Sets:


Linking notecards to a specific book and chapters is not only helpful for the creator of the notecards but also those searching for notecards. We hope you take advantage of this feature and link your notecards to the book and chapter(s) they are based on if applicable.

Development Update:
We're excited to announce that we are currently developing a new game that will be both fun to play and educational. There is no official release date but it should be up and running before the end of this Spring Semester. We'll keep you posted!

http://www.easynotecards.com
Thursday, January 26, 2012

New Overview Tab for Your Locker

Before we get started, if you are not familiar with your Easy Notecards Locker check out the blog post Your Easy Notecards Locker.

The new Locker Overview Tab provides a simple yet powerful summary of your locker's content. It's easy to use and saves you time by not having to click on each individual locker tab.  The Overview Tab is the first tab shown when viewing your locker or someone else's. When viewing someone else's locker certain data is not displayed such as recently viewed sets and marked sets. More on that below.

Content on the Overview Tab is broken down into 3 sections: Recently Viewed Sets, Locker Lists and Recent Activity. Let's take a quick look at each of these sections.

Recently Viewed Sets
15 of your most recently viewed notecard sets are displayed 3 at a time. Use the blue arrows to view more notecard sets. Click on the notecard set to continue studying. This feature is only show when viewing your own locker.


Locker Lists
The 4 most recent Created Sets, Marked Sets, Fav Sets, Fav Books and Fav Members are displayed as lists. The Marked Sets list is only shown when viewing your own locker.


Recent Activity
The 4 most Recent Activity Items are shown.


We think the Overview Tab will be a super helpful feature that you will use often.

Other News:
In the past, the matching game did not work correctly on touch-screen devices. We fixed that. Now you can play the matching game on your smartphone or tablet by tapping the cards to select them. Also, when editing a notecard set you now have the option to save it as a new set. When you use this option the original will remain unchanged and a new set will be created.

http://www.easynotecards.com

Tuesday, January 3, 2012

Study Only The Notecards You Don't Know

Before getting to the exciting news about the new Marking System, we'd like to wish you and yours a Happy & Healthy 2012!

Over the holiday break we were hard at work improving the Marking System for Easy Notecards. For those of you not familiar with the Marking System, here's a quick explanation of how it works:

Each notecard set has 3 piles: All Cards, Marked and Un-Marked . These piles are pretty easy to understand. The All Cards pile will always contain all notecards that belong to the set. The Marked pile contains your marked notecards and the Un-Marked pile contains your un-marked notecards. When you mark a card it will be moved from the Un-Marked pile to the Marked pile and vice versa. Our suggestion for using the Marking System is to mark the notecards you don't know and un-mark them as you learn them. This is only a suggestion. Feel free to use the Marking System in any way that helps you study.

Here's what we did to improve the Marking System:

Marked Cards Remembered
Your Marked cards will be remembered from study session to study session as long as you are signed in. No need to re-mark cards you marked during a previous study session. If you are not signed in only the most recent notecard set you marked cards for will be remembered. Another reason to register for a FREE Easy Notecards account.

Marked Notecards Tab in Your Locker
When you view your own Locker you will notice that we added a Marked Notecards tab (image below). This tab keeps track of all notecard sets you have marked cards for. It displays how many marked notecards the set has and the date you last marked a card for it.

Mark Cards in List View
In the past, you could only mark/un-mark cards in Notecard View. Now you can do it in List View. In List View simply click the card's number (#) to mark/un-mark it. Directly above the list, there is also an option to mark or un-mark all cards. Don't know how to get to List View? When viewing a notecard set click the List View link (image below) located below the Quiz and Matching Game buttons.


Marking System Tabs
We've added tabs (image below) for each of the 3 piles (ALL Cards, MARKED and UN-MARKED) to make it super easy to switch between them. Want to view only your marked cards? Click the MARKED tab. Tabs are available for both Notecard View and List View.


Take the Quiz or Play the Matching Game with Marked or Un-Marked Cards
In the past, all notecards were used for the quiz and matching game. Now you have the option to perform these activities with only Marked or Un-Marked cards. Let's say you marked 20 notecards you don't know for a particular set. Now you can take the quiz or play the matching game using only those 20 cards you don't know. Also, this option will be available for future activities we add to Easy Notecards.

Here's what it looks like when you want to take the quiz for a notecard set that has marked cards (notice you can also select to use random cards):

Print Only Marked or Un-Marked Cards
When printing a notecard set that has marked cards as notecards or as a list you now have the option to print ALL Cards, MARKED Cards or UN-MARKED Cards. Again, this is helpful when you only want to print certain notecards.

This is what it looks like when you want to print a notecard set that has marked cards:


The new Marking System saves you time by letting you study only the notecards you don't know. Questions/Comments about the new Marking System? Feel free to post a comment or contact us.

http://www.easynotecards.com
Thursday, December 15, 2011

Semester Wrap-Up

As the semester comes to a close for most teachers and students it also signifies the end of Easy Notecards' first semester. Our members have created over 40,000 notecards for 110+ books in a little over 3 months. It's great to see so many people of all ages and backgrounds benefiting from Easy Notecards. Teachers have used it for in class studying and homework and students have used it to ace their next test.

As Easy Notecards continues to grow we will continue to evolve to meet the needs of you, our users. Your feedback has been and will always be instrumental to the development of Easy Notecards. For example, many of you wanted a better way to separate notecards you know from those you don't. Our current system allows you to mark notecards you don't know. This works good except that your marked notecards aren't remembered for future study sessions. In a few days we will be releasing an enhancement that not only remembers your marked notecards but also allows you to select All Cards, Marked Cards or Un-Marked Cards when taking the quiz, playing the matching game or printing notecards. More on this in a future post.

I'll leave you with a few cool notecard sets from our first semester:


Have a Great Holiday Season!

Wednesday, December 7, 2011

Adding Items to Favorites

With Easy Notecards you can add notecard sets, books and members to your favorites. Before looking at the benefits of doing this, I'll show you how to add and remove favorites.

To add an item to your favorites click the appropriate Add to My Favorite Item Type(s) button where Item Type is either Notecard Set, Book or Member.

Here's the favorite button (circled in red) for a notecard set. The location is the same for a book and member.


Favorites are stored and organized in your locker. Your Easy Notecards Locker

To remove an item from your favorites either do so through your locker or click the Remove from My Favorite Item Type(s) on the item's page.

Benefits of  Favorites
The main benefit of favorites is being able to quickly access items that are helpful to you. For example, to view a book you previously added to your favorites you would go to your locker, click the Fav books tab and click the book.

Another benefits of favorites is the notifications that come along with them. Notifications are short messages about activities that may be of interest to you. Go to Settings to adjust what notifications you receive.

Here are the 3 notifications associated with the 3 favorite types:
  1. Favorite Notecard Set - You will be notified if one of your favorite notecard sets is edited
  2. Favorite Book - You will be notified if a notecard set is added to one of your favorite books
  3. Favorite Member - You will be notified is one of your favorite members creates a new notecard set
Favorites is another way Easy Notecards saves you valuable time and energy.


Wednesday, November 30, 2011

New Feature: Related Sets

The new Related Sets feature on Easy Notecards displays up to 5 notecard sets similar to the notecard set you are currently viewing.

The Related Sets section (circled below) can be found below the notecard set details:


Try it for yourself. Check out the Related Sets for Plants In Spanish/English.

This new feature makes it even easier for you to find valuable notecards to study (students) or use as a teaching tool (teachers).

http://www.easynotecards.com
Monday, November 21, 2011

New Feature: Quick Edit

The new Quick Edit feature on Easy Notecards allows you to quickly and easily edit an existing notecard without leaving the notecard set page.

To quick edit a notecard click the edit icon for the notecard you want to edit. The location of the edit icon depends on if you are in Notecard view or List view.

Here's the edit icon in Notecard view:


And here's the edit icon in List view:


Clicking the edit icon brings up this box that allows you to edit the text and images for the notecard:


Click Save to save your changes.

Quick Edit saves you a lot of time when you want to edit existing notecards. If you want to add or delete notecards or edit other sections of the notecard set such as title or description you will still need to use the full edit page.

http://www.easynotecards.com