Tuesday, February 14, 2017

How To Add A Class Link

Class links are links to outside resources related to a class such as the class website, syllabus, assignments, etc. Anything that has a URL address (www.example.com) can be added as a class link.

Only class creators and admins can add class links.

To add a class link, go to the page of the class you want to add to and follow these steps:
(See screenshots below for a visual representation of these steps)
  1. Click the "Links" tab
  2. Click "Add a Link"
  3. Enter the "Text to display"
  4. Enter the "URL"
  5. Click "Save"

Screenshot 1


Screenshot 2


That's all it takes to create a class link. To remove a class link simply click the corresponding "X".


Class Admins: What They Are And How To Add One (Or More) To Your Class

If you don't know what Easy Notecards Classes are check out Introduction to Classes.

Class Admin Privileges

Here's what class admins can do that regular class members cannot:
  • Add and remove sets*
  • Add and remove class links
  • Invite members*
  • Remove members who are not admins
  • Accept and deny requests to join the class
*By default, regular class members can add sets and invite members; however, the class creator can turn these options off.

How to Grant Admin Privileges

To grant or revoke admin privileges you must be the class creator. A class can have multiple admins.

On the page of the class you want to add an admin to follow these steps:
(See screenshot below for a visual representation of these steps)
  1. Click the "Members" tab
  2. Click the down arrow for the member you want to grant admin privileges to
  3. Click the "Grant admin privileges" option


You will then be presented with a dialog to confirm your action.

That's it. You can easily remove admin privileges for a member by following the same steps.

Try it out now by creating your first class!

Good Luck this semester!

http://www.easynotecards.com

Tuesday, October 4, 2016

Introducing Classes

We're excited to introduce you to Easy Notecards Classes. With classes, you can manage card sets, links and members (classmates or students) for specific classes.

Here are a few class features:
  • Create/Join an unlimited number of classes.
  • Each class can have an unlimited number of card sets, links and members.
  • Class links can be used to link to outside resources such as a class website, syllabus, assignment, etc.
  • Control who can view your class. By default, the class is only viewable by class members.
  • Allow others to join your class by providing them with the class code or the auto join link.
  • Promote other class members to class admins. Class admins have additional privileges that regular class members don't.
  • Turn on the option "Require full name to join" to easily manage class members.
  • Instructor and school can be entered for easier searching. (Class search coming soon)
  • Add private and protected sets to a class. These sets will be viewable by all class members without the need of a password.

Below you'll learn how to create, join and invite members to a class. But first, let's take a look at the Class page.

Class Page

Once you are a member of a class the Class page will look something like this: (Red numbers have been added for identification)


  1. Class Details tab - Displays info such as creator, instructor, school and description.
  2. Invite tab - Displays class link, auto join link and class code. Class creator controls if all class members can access this tab.
  3. Class Options - Provides options to edit (creator only), delete (creator only), leave or report a class.
  4. Class Sets tab - Shows all class sets. By default, all class members can add sets. Click Add a Set to add 1 or more sets from your created or favorite sets. Class creator and admins can remove any set. Other members can remove sets they added. 
  5. Class Links tab - Shows all class links. Only the class creator and admins can add and remove class links.
  6. Class Members tab - Shows all class members. Class creator can grant/revoke admin privileges and remove members. Class admins can remove members except for the class creator and other class admins.
  7. Class Activity - Displays certain activity such as when a class member adds a set/link or joins/leaves the class.


How to Create a Class

To create a class click Create Class on the My Classes page. Here's what the create Class Page looks like:


Class name is the only required field but it is highly recommended you include instructor and school.
  • Class name - The name of the class.
  • Description - A description of the class.
  • Instructor - The class instructor(s). You also have the option to select I'm the instructor which will make it clear to anyone who views the class that it was created by the instructor.
  • School - The school the class takes place at. Schools for other classes you belong to will be available for easy selection.
  • Who can view class data - By default, only class members can view class data (sets, links, members and activity), however, you can choose to allow everyone to be able to view this data.
  • Require full name to join - When this option is selected, a first and last name is required to join the class. Please note, once there is more than 1 class member this option cannot be turned on.
  • Who can add sets - By default, all class members can add sets, however, you can choose to allow only the class creator and admins to be able to add sets.
  • Who can invite others - By default, all class members will be able to see the Invite tab. The Invite tab displays info on how to invite other members. You can change this so only the class creator and admins can see this info.


How to Join a Class

If you have the class code, go to the My Classes page, click Enter Class Code.. and enter the class code. You can also enter the class code on the Class page.

If you are provided with a class link, chances are it is an auto join link. An auto join link allows you to join a class automatically without having to enter the class code. If it's not an auto join link you will either have to enter the class code or request to join the class.

You can also be invited within Easy Notecards to join a class. When invited, you will receive a notification on your Notifications page that has a link to the class. When you go to the class page you will be able to join the class without having to enter the class code.

If you don't have the class code or an auto join link and have not been invited to join a class you can still request to join a class. To do this go to the Class page and click the Request to join this class link. The class creator (and admins) will have the option to either accept or deny your request.

How to Invite Others to Your Class

By default, all class members can view the Invite tab. The Invite tab (shown below) shows the multiple ways you can invite others to your class.


  • Class link - Basic link to the class. Users will still need the class code to join or they can request to join the class.
  • Auto join link - Users who use this link can join the class automatically. 
  • Class code - Users who have the class code can join the class either on the My Classes page or the Class page.
You can also invite members from their Locker page. To do this, go to the Locker of the member you want to invite, click Invite to Class (top right corner), select the class(es) and click Invite. The member will receive an invite notification that will allow him/her to join the class automatically.

More To Come...

Two class features that will be added in the near future are Class Search and Class Discussion. We also plan on adding a Teacher Mode, which will allow teachers to track their students' activity. This feature is a little further down the road.

Classes are a great way to share and organize your course material. Try them out today: Easy Notecards Classes

Good Luck this semester!

http://www.easynotecards.com

Monday, February 2, 2015

Run Easy Notecards as a Web App

We're excited to announce that you can now run Easy Notecards as a web app on both iOS and Android devices. To do this simply add Easy Notecards to your home screen from your browser.

Here are the benefits of running Easy Notecards as a web app:
  • Launch Easy Notecards with an icon on your homescreen. No need to open your browser.
  • None of the browser's UI (address bar, back button, etc.) will be visible.
  • Easy Notecards will be its own entity in Recent Apps.
  • Unlike traditional apps you will ALWAYS be using the latest version of Easy Notecards. No need to update ever.


Website vs Web App

How to Add Easy Notecards to Your Home Screen

Follow theses simple steps to add Easy Notecards to your home screen. Your screen may differ slightly based on the device and OS version you are using.

iOS (iPhones and iPads) 

Step 1: Open Safari and navigate to EasyNotecards.com
Step 2: Tap the Share Button
Step 3: Tap Add to Home Screen
Step 4: Tap Add


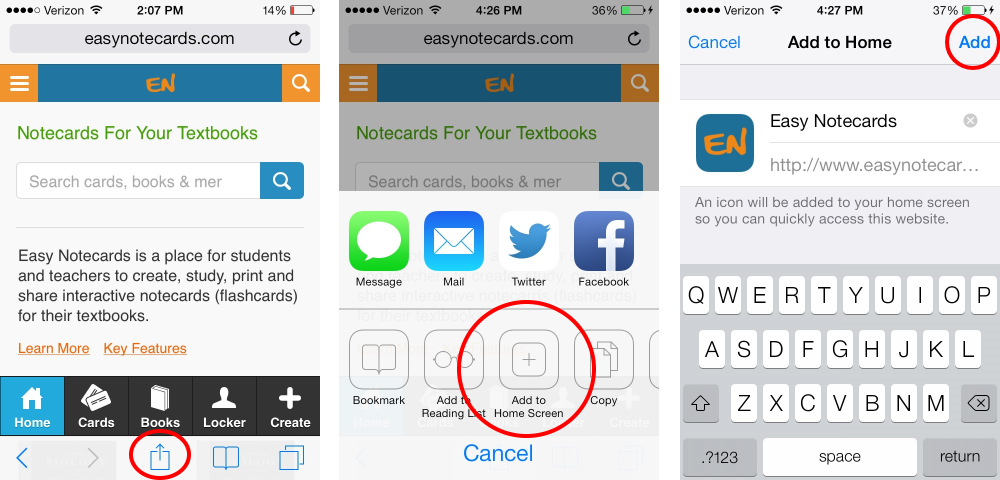
Steps to add to iOS Home Screen

Note: On iOS, whatever page you are on when you add Easy Notecards to your home screen will be the first page shown every time you launch Easy Notecards.

Android (phones and tablets)

Step 1: Open Chrome and navigate to EasyNotecards.com
Step 2: Tap the Menu Button
Step 3: Tap Add to homescreen
Step 4: Tap Add


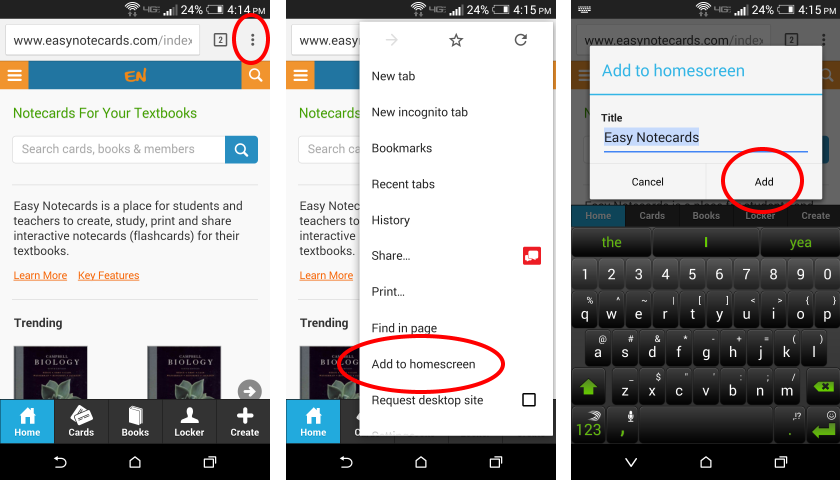
Steps to add to Android Home Screen

That's it! Now you can launch Easy Notecards directly from your home screen.


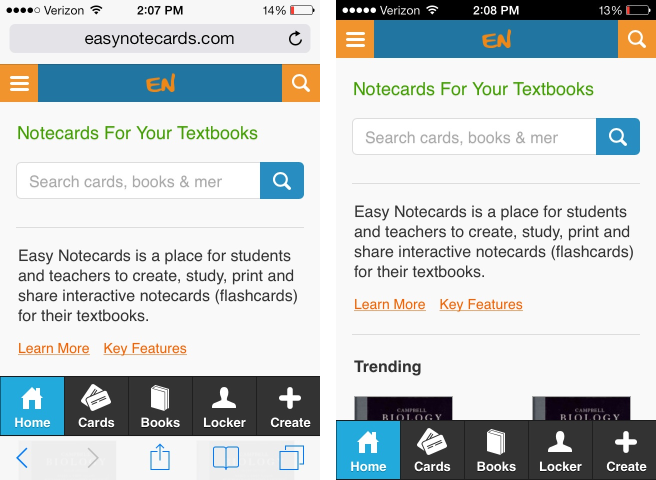
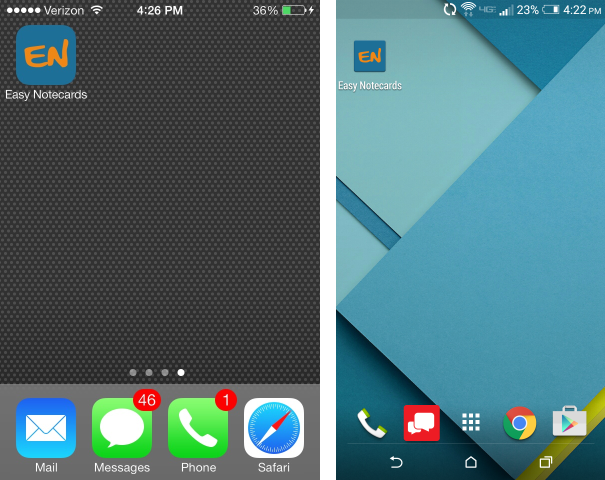
Easy Notecards on Home Screen for iOS and Android 

Navigating Back a Page

Android users can simply use the dedicated back button to go back a page within Easy Notecards. For iOS users there is no dedicated back button so we added a back button within the web app. Look at the image below to see the location of the back button.
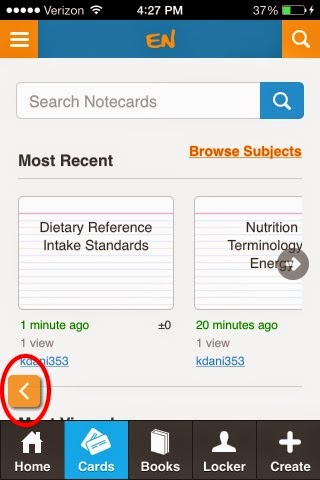


Back Button on iOS 

Note: While taking a quiz or playing a matching game the back button is temporarily removed so that it doesn't interfere with the activity.


If you use Easy Notecards on your mobile device you should definitely run it as a web app. It's super easy to do and makes the experience that much better.

Good Luck this semester!

http://www.easynotecards.com

Saturday, January 10, 2015

Our Quizzes Just Got A Whole Lot Smarter

A dynamically created quiz can be taken for any notecard set that has at least 2 full cards. Since the quiz is created on the fly it will be different every time you take it.

The Old, Not So Smart Quizzes

The main problem with the old quizzes was that the wrong answers for each question were chosen at random. This often resulted in quiz answers that were very different from each other making it easier to select the correct answer.

For example, let's say you created a card set that contained both multiple choice and true false questions. You go to take the quiz and the first question is a true/false question. You look at the possible answers and this is what you see: True, B, A, C. The only possible answer to the question is True since False is nowhere to be found.

In addition, there were times when a quiz question would contain duplicate answers. Not only did this reduce the number of possible answers by 1, an observant user would soon learn that a duplicate answer was never the correct answer.

All of this has been eliminated with our new, smarter quizzes.

The New, Smarter Quizzes

First, answers are never duplicated.

Second, the wrong answers are no longer randomly selected. They are selected based on how similar they are to the correct answer.  If the correct answer to a quiz question has an image with no text then the wrong answers will have an image with no text (if they exist within the card set).

Similarity between the correct answer and wrong answers is based on:
  • total number of words
  • total number of characters
  • contains a list
    • if a list exists then list type is considered
  • has an image

Lastly, True/False and Yes/No are special cases that are handled differently. Only 2 answers are presented to the user for these type of questions.

We hope you enjoy the improvements to our quizzes. Try it out on your own sets or try one of these:


Wednesday, December 10, 2014

Edit Single Card

You can now edit a single card without having to edit the whole set. This can be done in both list and card view.

To edit a card in list view click the card #. On touch enabled devices you can also swipe left or right on the card to start the edit process.


To edit a card in card view click the edit card icon.


When editing a single card you have the same options as you do when creating or editing a set.


When done editing click Save to save changes or cancel to discard them.


That's it. Now you don't have to edit a whole notecard set just to edit one or two cards.

Good Luck!


Sunday, November 30, 2014

Create Set Page Updated with New Formatting Options

The Create Set page has been updated to match the new responsive design of Easy Notecards. This new responsive design looks and works great on all your devices.

The biggest feature offered by the new Create Set page is the ability to format notecards. With a few simple tools you can now add emphasis and style to your cards.

Formatting Toolbar


The camera icon is used to upload or link to an image.

Formatting Toolbar Buttons (left to right):
  • Undo
  • Redo
  • Bold
  • Italic
  • Underline
  • Superscript
  • Subscript
  • Background color - Click down arrow to choose from 5 colors:
    • yellow
    • lime
    • aqua
    • pink
    • orange
  • Bullet list - Click down arrow to choose from 4 types:
    • Default 
    • Circle
    • Disk
    • Square
  • Numbered list - Click down arrow to choose from 6 types:
    • Default - 1, 2, 3, etc
    • Lower Alpha - a, b, c, etc
    • Lower Greek - α, β, γ, etc
    • Lower Roman - i, ii, iii, etc
    • Upper Alpha - A, B, C, etc
    • Upper Roman - I, II, III, etc
  • Decrease indent - Can be used for lists and paragraphs
  • Increase indent - Can be used for lists and paragraphs

We may add additional formatting options in the future based on user request.

Formatting Tips
  • Toolbar keyboard shortcuts:
    • ctrl+z Undo
    • ctrl+y Redo
    • ctrl+b Bold
    • ctrl+i Italic
    • ctrl+u Underline
  • To increase/decrease indent for a list or paragraph you must use the toolbar buttons since pressing TAB takes you to the next card
  • Formatting is kept when pasting from another source. This doesn't always work well. Use ctrl+shift+v to paste as plain text. (In chrome you can also right click and select Paste as plain text)
  • To single space use shift+enter

Quick Note. The ability to edit a card from list and card view will be added back sometime this week. Import cards will be added back within the next 2 weeks.

As the semester winds down we here at Easy Notecards have a message for you all:

"Good Luck and FINISH STRONG!"